Pause print - pull extruder lever - pull filament out - feed new filament - continue print.
Thanks!
I thought that was the right way but wanted to make sure I did not mess anything up though an assumption. :D
Filament swapping is a technique used in FDM printing which allows you to use different colors for different layers of your model. It’s a relatively simple process and can be done on most FDM machines:
This method is great for things like logos or plaques with extruded text. The bottom portion of the model can be printed in one color and then changed to highlight the upper portions. This can be done as many times as you’d like but can be a bit tedious and is often challenging to get right.
Filament dyeing, much like filament swapping, allows you to color different layers in your model. This technique works best with nylon filament. Nylon is notorious for absorbing moisture and needs to be kept in a dry or sealed environment, but it’s this property that also allows it to readily absorb fabric dye. We’ve found that Rit dye works best for this process, and for a more in-depth tutorial, check out our blog on the 5 Steps to Tie Dye Filament. We’ll give a quick rundown of the process here.
This process can produce some pretty impressive results, but gives very little control over the placement of different colors on your model. Many nylon filaments require high extrusion temperatures, upwards of 245C, which is higher than many hotends can handle. For a lower temperature nylon, check out Taulman’s Nylon 230.
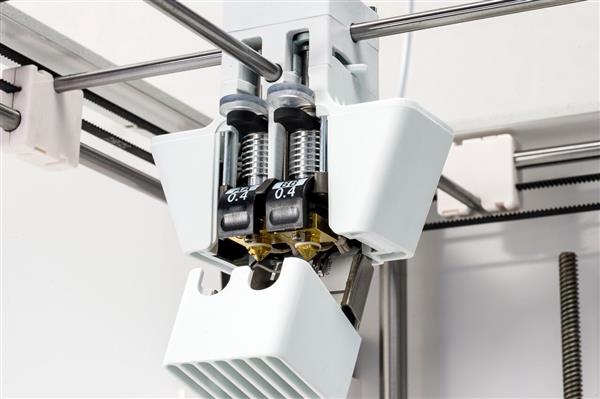
Printers with multiple extruders have historically run into challenges with reliability and ease-of-use, but the technology continues to improve. Dual-extrusion printers function by having multiple extruders feed different types and/or colors of filament into a hotend or hotends. There are two main techniques for doing this.
The more popular includes two or more extruders and two or more hotends. Each extruder feeds filament to a single hotend which is used to print a section of the model. The number of extruders used directly correlates with the number of different colors or materials that can be used.
A newer and less common technique for multi-extrusion involves one hotend and multiple extruders. Each of the extruders feeds to a coupling and only one extruder is active at a time. The active extruder continues to feed filament to the hotend. For differently colored sections, the active extruder stops and another takes over. The residual filament in the hotend is ‘purged’ until the new material starts to flow. This technique eliminates many of the calibration challenges associated with typical multi-extrusion and is the process used for the multi-extrusion upgrade on the Prusa Mk II.

One of the bigger benefits of dual-extrusion is the ability to print your object and supports separately. This allows you to use water soluble materials like PVA as support structures. After printing, your part can be submerged in water or a similar compatible solvent to dissolve the supports.
![]()
Filament splicing is a technique that allows you to produce selectively colored prints with a single extruder and hotend. The Palette is one of the more popular devices for splicing filament. It takes in up to 4 different colors and ‘splices’ them together into a single continuous strand.

This is similar to filament swapping and dyeing, but the palette is autonomous meaning you can be more selective with which parts of your model are colored. The palette will automatically splice different filaments into the necessary configuration to color the sections you’re looking for. This technique is great for adding color to your prints but doesn’t work as well for dissimilar materials. Techniques like printing the supports and object separately work less well on the palette both because splicing dissimilar materials is challenging and because the different materials require different print settings.
There are a few printing technologies that allow multi-color printing by default though these are currently available only in professional level machines.
PolyJet is a process by which small droplets of photo-polymer resin are ‘jetted’ onto an object and then cured by a UV light. Some PolyJet machines can color these droplets prior to deposition producing a full-color 3D part. PolyJet machines can also print in multiple materials with one of the more common examples being the use of a wax-like material for support structures that is melted out via a heated chamber after printing.

Binder jetting is a different process by which a binder or glue-like substance is deposited onto a powderized substrate. In this case, the binder is colored prior to being deposited. Binder jetting often produces less crisp results compared PolyJet because the dye bleeds into surrounding powder. Both PolyJet and binder jetting are industrial level processes that aren’t yet accessible to hobbyists.
New techniques for printing in multiple materials or adding color
to your designs are always being developed. These are some of the
most popular methods currently and offer a diverse range of costs
and required equipment. If you’re more interested in
painting, stay tuned for an upcoming blog post that will
teach you the basics of painting your printed parts.