GPIO   Button Press   GPIO        GPIOZERO
This is a 3.3V device. Using 5V peripherals requires a logic level converterInput
  • Threshold of 1.8V
  • Maximum 0.5 mA
  • Use a 6Kohm resistor to ensure that current from a 3.3V source cannot exceed 0.5 mA
    • ( 3.3V / 6000Ω = .00055A )
  • Output
    • Maximum total of all pins 50 mA.
    • Default 8 mA max per pin. (Returns to this configuration after reset.)
    • Software configurable from 2 mA to 16 mA. Do not source or sink more than what you've configured.
    • Don't drive capacitive loads.


Switch    >>> 10k Ω Resistor   3.3 v

Switch to GND
3.3v relay?
.1ufd
82kΩ
https://www.circuitlab.com/editor/#?id=7sccre

https://www.linkedin.com/pulse/debouncing-your-iot-buttons-ian-harris

cat 1 ufd  r2 18ke

R1
+ R2 works out to 101K. Figure on 82K (a standard part) for R1.
Figure 3:


https://www.amazon.com/SODIAL-Proto-Shield-Raspberry-Model/dp/B07G71TQSX/ref=sr_1_1?ie=UTF8&qid=1536531851&sr=8-1&keywords=raspberry+proto+board


Capacitors for no bounce.
5v relay
OPTOS  PC817
Opto Isolator Board
Video
Cambridge Site Button   Fire LED
7 Segment
7-Segment LED Decoder
Emulator  
Emulator II
Emulator
http://www.falstad.com/circuit/e-7segdecoder.html
https://github.com/arv/explorercanvas

Halt Start Powerdown
Halt Start

Timed Button (high.. raising)
import time import RPi.GPIO as GPIO PIN = 18 GPIO.setmode(GPIO.BCM) GPIO.setup(PIN, GPIO.IN, pull_up_down=GPIO.PUD_UP) while True: GPIO.wait_for_edge(PIN, GPIO.FALLING) print "Pressed"


Be careful you copy the correct indentation, otherwise Python will throw up some nasty errors!

On my system where I trigger a snapshot, I configure the pin with a pullup. This saves having to mount the pullup externally.
(I happen to use a different pin).
Oh. And in my script I have a "time.sleep (0.1)" in both cases where the switch is stable. Otherwise the CPU will be polling as fast as it can all the time, wasting power and crowding out other programs that might need to do something. >>> Less CPU button.py
import RPi.GPIO as GPIO
import time
import os
GPIO.setmode(GPIO.BCM)
GPIO.setup(17, GPIO.IN)
prev_input = 0
while True:
  input = GPIO.input(17)
  if ((not prev_input) and input):
    os.system("sudo shutdown -h now")
  prev_input = input
  time.sleep(0.05)

Code: Select all

GPIO.setup(4, GPIO.IN, pull_up_down=GPIO.PUD_UP)


import RPi.GPIO as gpio gpio.setmode(gpio.BCM) gpio.setup(17, gpio.IN) while True: input_value = gpio.input(17) if input_value == False: print('The button has been pressed...') while input_value == False: input_value = gpio.input(17)


Emulate keyboard

#!/usr/bin/python
# Script for Raspberry Pi Internet Radio

# import
import RPi.GPIO as GPIO
import time
import os

PRESSTIME = 0
PLAYING = False

# Define GPIO to LCD mapping
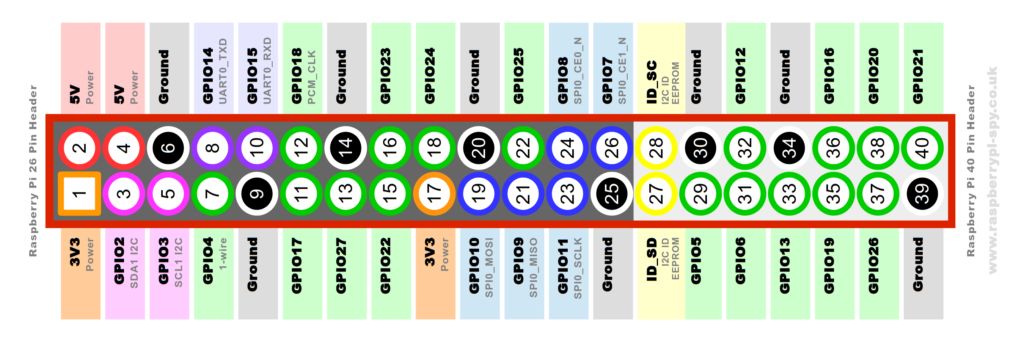
LCD_RS = 25 # LCD Pin 4
LCD_E  = 8 # LCD Pin 6
LCD_D4 = 4 # LCD Pin 11
LCD_D5 = 10 # LCD Pin 12
LCD_D6 = 9 # LCD Pin 13
LCD_D7 = 11 # LCD Pin 14

# Define GPIO for Radio Controls
# Button 1 goes to the Pi-Supply to turn the computer on
PREV = 23 # Button 2 - Previous track. Black wires
PLAYBUTTON = 27 # Button 3 - Play. Green Wires
STOPOFF = 22 # Button 4 - Brown wires. Press for stop. Long press for shutdown.
NEXT = 24 # Button 5 - Grey wires. Next track.

# Define some device constants
LCD_WIDTH = 20    # Maximum characters per line
LCD_CHR = True
LCD_CMD = False

LCD_LINE_1 = 0x80 # LCD RAM address for the 1st line
LCD_LINE_2 = 0xC0 # LCD RAM address for the 2nd line
LCD_LINE_3 = 0x94 # LCD RAM address for the 3rd line
LCD_LINE_4 = 0xD4 # LCD RAM address for the 4th line 

# Timing constants
E_PULSE = 0.00005
E_DELAY = 0.00005

# What do you want the display to say when it's loading
startupline1 = "+------------------+"
startupline2 = "|   Raspberry Pi   |"
startupline3 = "|  Internet Radio  |"
startupline4 = "+------------------+"

shutdownline1 = "+------------------+"
shutdownline2 = "|   Shutting Down  |"
shutdownline3 = "|    Please Wait   |"
shutdownline4 = "+------------------+"

stopline1 = "+------------------+"
stopline2 = "|       Music      |"
stopline3 = "|      Stopped     |"
stopline4 = "+------------------+"


def main():
	# Main program block
	GPIO.setmode(GPIO.BCM)       # Use BCM GPIO numbers
	GPIO.setup(LCD_E, GPIO.OUT)  # E
	GPIO.setup(LCD_RS, GPIO.OUT) # RS
	GPIO.setup(LCD_D4, GPIO.OUT) # DB4
	GPIO.setup(LCD_D5, GPIO.OUT) # DB5
	GPIO.setup(LCD_D6, GPIO.OUT) # DB6
	GPIO.setup(LCD_D7, GPIO.OUT) # DB7
  
	GPIO.setup(NEXT, GPIO.IN) # Next Track
	GPIO.setup(PREV, GPIO.IN) # Previous Track
	GPIO.setup(PLAYBUTTON, GPIO.IN) # Play
	GPIO.setup(STOPOFF, GPIO.IN) # Short Press is stop, long press is shutdown

  
	# Initialise display
	lcd_init()
	# Send some test
	lcd_byte(LCD_LINE_1, LCD_CMD)
	lcd_string(startupline1,2)
	lcd_byte(LCD_LINE_2, LCD_CMD)
	lcd_string(startupline2,2)
	lcd_byte(LCD_LINE_3, LCD_CMD)
	lcd_string(startupline3,2)
	lcd_byte(LCD_LINE_4, LCD_CMD)
	lcd_string(startupline4, 2)	 
	os.system("mpc play 1")
	PLAYING = True
	time.sleep(2) 
	while 1:


Long puts button.

The equation for discharging a cap is:
( RC )
t
cap initial V V e

=
where
cap V is the voltage across the capacitor at time t,
initial V is the voltage initially on the cap,
t is the time in seconds,
R and C are the values of the resistor and capacitor in ohms and farads,
respectively.
The trick is to select values that insure the cap’s voltage stays above th V , the threshold at
which the gate switches, till the switch stops bouncing. It’s surprising how many of those
derelicts hanging out at the waterfront bars pick an almost random time constant. “The
boys ‘n me, we jest figger sumpin like 5 msec”. Shortchanging a real analysis starts even
a clean-cut engineer down the slippery slope to the wastrel vagabond’s life.
Most of the switches I examined last month had bounce times well under 10 msec. Use
20 to be conservative.
Rearranging the time constant formula to solve for R (the cost and size of caps vary
widely so it’s best to select a value for C and then compute R) yields:
ln( )
initial
th V
C V
R t −
=
Though it’s an ancient part, the 7414 hex inverter is a Schmitt Trigger with great input
hysteresis. The AHCT version has a worst case th V for a signal going low of 1.7 volts.
Let’s try 0.1 μF for the capacitor since those are small and cheap, and solve for the
condition where the switch just closes. The cap discharges through R2. If the power
supply is 5 volts (so initial V is 5), then R2 is 185K. Of course, you can’t actually buy that
kind of resistor, so use 180K.
Page 15 A Guide to Debouncing
But… the analysis ignores the gate’s input leakage current. A CMOS device like the
74AHCT14 dribbles about a microamp from the inputs. That 180K resistor will bias the
input up to .18 volts, uncomfortably close to the gate’s best-case switching point of 0.5
volt. Change C to 1 μF and R2 is now 18K.
R1 + R2 controls the cap’s charge time, and so sets the debounce period for the condition
where the switch opens. The equation for charging is:
(1 RC )
t
th final V V e− = −
Solving for R:
ln(1 )
final
th V
C V
R t


=
final V is the final charged value – the 5 volt power supply. th V is now the worst-case
transition point for a high-going signal, which for our 74AHCT14 a peachy 0.9 volts. R1
+ R2 works out to 101K. Figure on 82K (a standard part) for R1.

Figure 3: An RC debouncer that actually works in all cases
The diode is an optional part needed only when the math goes haywire. It’s possible, with
the wrong sort of gate where the hysteresis voltages assume other values, for the formulas
to pop out a value for R1 + R2 which is less than that of R2. In this case the diode forms a
short cut that removes R2 from the charging circuit. All of the charge flows through R1.
Page 16 A Guide to Debouncing
The previous equation still applies, except we have to account for drop across the diode.
Change final V to 4.3 volts (5 minus the 0.7 diode drop), turn the crank and R1 pops out.
Be wary of the components’ tolerances. Standard resistors are usually ±5%. Capacitors
vary wildly - +80/-20% is a common rating for electrolytics. Even small ceramics might
vary ±30%.