1. Remove the battery and remove the rubber that protects the caps. Then, remove the caps as well. Some batteries may have 6-7 caps, but some may have more-or-less. It is mandatory to remove all of them.
2. Fill a battery with the distilled water and recharge it. Keep in mind that you shouldn’t put the caps back. Place the battery on a charger and charge it for one hour.You should see bubbles on the holes.
If there are no bubbles, reverse the negative and positive wires and wait for 2 minutes. You should see the bubbles now. Reverse the wires to the correct position and recharge the battery for additional 30 minutes.
3. You can also try to replace the acid inside a battery and mix a new acid with the distilled water. Then, recharge the battery for a few hours. In any case, you will get a new battery that can last for a long time.
How to Recondition a Laptop Battery
Laptop battery reconditioning is more than just possible and there are a lot of different ways to achieve that, but some of them may be time consuming. In any case, it is the best choice to try simply because a new laptop battery is expensive and it may cost more than a new laptop.
On the other side, all of these ways are simple and you can do them by yourself. Laptops that have removable batteries are much simpler to do this, but you can try these steps on laptops with non-removable batteries.
In addition, do not use these solutions on a new battery, simply because this will have a negative effect and they will get damaged. In any case, you can recondition an old battery and you will be able to use that laptop for a lot more time. The best part is that all solutions cost nothing.
Solution 1
Remove a battery from your laptop and place it is a plastic bag.
Place it in a freezer and wait for 12 hours. Then, remove it from the bag and clean it.
Place it in a laptop and fully recharge it.
If the battery is not leaking, there is no acid around it, this way will be successful. In any case, you will end up with a new battery that can last for a long time. In addition, you can repeat the procedure a few times.
Solution 2
Some laptops must be ‘’reset’’ in order to get better battery life. This is a very simple solution, but it isn’t very successful. In fact, it is more about recalibrating a laptop than to reconditioning a battery. On the other side, most people have said that this is an effective solution.
Recharge the battery until it is 100% full and leave the laptop for 2-3 hours.
Now, leave the laptop unplugged and wait until the battery is completely empty and your laptop is turned off.
Leave it in this state for 5 hours.
Recharge the battery until it is 100% full. It is known that this solution increases the battery life and will make your laptop get more accurate info about the battery levels.
Solution 3
Reducing the temperature of your laptop seems to have a positive effect on the battery life. All you need to do is to buy the cooler and place a laptop on it. This will reduce the temperature of the battery and the laptop, so the battery will last longer. During the warmer months, this is an even better thing to do.
Solution 4
This method is more than just effective, but it is a time-consuming process. In any case, you will have to plug in the battery and wait until it is 100% full. Then wait until it is almost empty, about 5%. Then, plug it in again and recharge it again. Repeat the procedure several times, until you get a reconditioned battery.
Solution 5
This solution may sound weird, but it is very simple. Also, it is only possible if your laptop has a removable battery. You will have to plug a laptop in and leave it to charge. When the battery is completely full, remove the battery from a laptop. If your laptop cannot function without a battery, this procedure won’t be effective. On the other side, if it can, the battery life will be extended.
This is possible due to the fact when you do it, you will stop the chemical process in the battery and you will reset it. As the end result, your battery will be able to recharge a lot better and stay full for a longer period of time.
Recondition NiCad Batteries
You should know that NiCad batteries can be reconditioned as well. However, first you should know why they get damaged. This happens, due to the sulfur crystals that eventually reach both terminals and it prevents charging. This can be solved, so your batteries will last for a long time. In addition, the procedure is more than just simple.
1. You are going to need the flash camera capacitor. There are a lot of cheap cameras of this type that you can disassemble and use their parts. You will know what a capacitor is, due to the fact it is a big cylinder part.
2. Add a battery holder and a switch to the capacitor. Stick the wires to the big black cylinder and connect them with the battery holder and a switch.
3. Make sure all wires are insulated and they don’t touch anything that can conduct electricity.
4. Place an alkaline battery into the capacitor and the NiCad battery into the holder you added before.
5. Then, press the switch and wait the LED to glow. Then repeat the step. Keep in mind that you should hear a sound, that means that the sulfur crystals are destroyed and your battery can be used again.
Once you make this ‘’gadget’’ you can use it for reconditioning NiCad batteries for ever. It may sound complicated, but it is very simple, and you cannot make a mistake. In addition, it is possible to buy a capacitor for this application, but it is too much expensive and it won’t do the job better than this device.
How To Recondition Lead Acid batteries
Lead acid batteries are expensive, so reconditioning one is a better choice than to buy a new one. At the same time, it is possible to fix an old battery and get several more years from it. In any case, this is a simple procedure, but it may be dangerous, due to the fact the acid can be dangerous. In any case, you will have to follow the next steps.
Bring your old batteries back to life instead of buying new ones.
1. Remove the battery and open the caps. Some batteries have rubber protection, but you can easily remove it as well. Remove all the caps and do not place them back until you are done.
2. In most cases, a battery won’t have enough distilled water and this is the main issue. In that case, add the distilled water and recharge the battery. Once again, do not place the caps back. Keep in mind that the battery must have between 13 and 14 volts when you measure it with a voltmeter.
3. If this doesn’t solve the problem, you can try a more aggressive method. You should get an acid pack and replace the acid and add new distilled water. In that case, repeat the procedure with charging and you should get a new battery.
Don’t forget that the charging battery should be between 10 and 12 hours, if you use a slow charger. On the other side, if you use a quick charger you can recharge it in less than 6 hours. It is a much better choice to measure the battery levels with a voltmeter, while charging in order to get the best results.
Keep in mind that this type of acid can be dangerous, so it isn’t a very safe procedure, but you can manage it and be completely protected if you wear goggles and gloves. The situation is the same if you are planning to completely replace the battery acid.
In some cases, if the battery cells are damaged, you won’t get the 100% capacity from the battery, as when it was new. On the other side, you will get more than 70% of the power the battery had when it was new. This is enough for most batteries, simply because it is enough power for their applications.
Learning yourself how to recondition batteries will have a positive effect on the environment and the planet in general. At the same time, you will save money and you will be able to prolong the life of your batteries. On the other side, all these procedures are very simple.
BatteryAZ Copyright © 2020.
f batteries appear dead, as in this good video, they may be sulfated. Simply remove about 15% of the battery acid and refill with distilled water (or use an hydrometer to set the battery acid in the middle of the yellow band). Then put on charge for about 24 hours. The Sulphur will be drawn into the acid to recreate a chemical balance and the battery could be usable again, i.e. it will be de-sulfated.
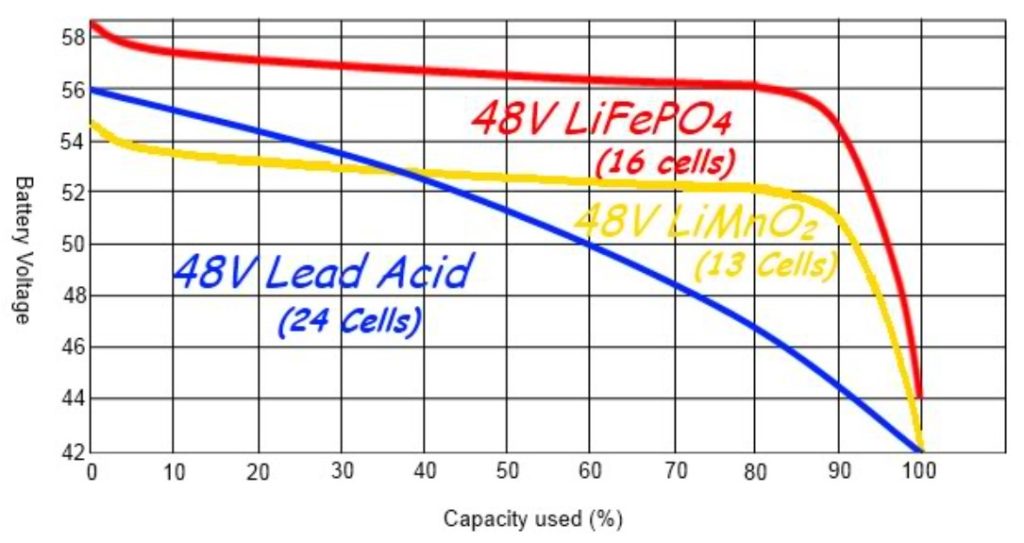
Battery CHarge Curves see FMP file.

at Home
| R = |
| |||
| = |
| |||
| = | 0.12 ohm (Ω) |
| P = | V × I |
| = | 12 volt × 100 ampere |
| = | 1200 watt (W) |
The following will be specific to lead-acid batteries. Although you don't need to wait until a battery is depleted to recondition it, put safety first. A quick visual inspection will determine whether the battery is viable for reconditioning. Check for cracks, bulges, or broken pieces of any kind. If the battery is not in good physical shape, it is best to purchase a new one.
The process of battery reconditioning does not require an engineering degree, although it does take patience. Most of the items you'll need you're likely to have at home. Below is the essential list of supplies:
Equipment:
- Protective wear (e.g., safety goggles, chemical-resistant gloves, apron)
- Toothbrush
- Steel wool or battery terminal cleaner
- Flathead screwdriver
- Funnel
- Two large buckets
Ingredients:
- 1 gallon of distilled water (no tap water due to chemicals added)
- 1 pound of baking soda
- 1 pound of Epsom salt
Specialty items:
- Battery charger
- Voltmeter
Verify the voltage –
Connect the voltmeter. Like jumpstarting a car, the red cable connects
to the positive terminal and the black cable to the negative terminal. A
standard car battery contains six cells, each producing about 2.1
volts. Therefore, a healthy battery will read 12.6V. Between 10V and
12.6V will mean you can recondition the battery. At less than 10V,
replace the battery instead.
Mix the baking soda with distilled water to create a watery paste. The ratio should be 2:1 or 1:1 of baking soda to distilled water. Don’t use any other type of water (like tap water) as these may contain unsuitable trace minerals.
This solution will act as the battery cleaner and also to neutralize any acid spills.
2. Clean The Battery Of Corrosion
Detach the battery cables — negative (-) battery terminal first, then the positive (+) terminal.
Apply the cleaning solution to any corroded battery terminal, then use the toothbrush or steel wool to scrub. Corrosion impedes the transfer of electrical energy, so it’s important to remove it from the terminals and cable connectors.
Alternatively, a dedicated battery terminal cleaner would also work here.
3. Empty The Battery Cells
Remove each battery cap and place them in a temporary container, so you don’t lose them. If it’s a sealed battery, use the flathead screwdriver to pry off the battery cover and battery cell caps underneath.
Carefully empty the battery acid from each cell into the bucket.
Add around 500gm of baking soda to the bucket to neutralize the battery acid, so it’s safe for disposal at a recycling center.
If there are any spills, pour the baking soda cleaning solution to neutralize this too.
4. Clean The Battery Cells
With a funnel, fill each battery cell with the cleaning solution. Replace the battery caps and shake the battery between 30 seconds to 1 minute.
Open the battery caps again and empty the cleaning solution into the bucket.
5. Replace The Battery Electrolyte
Dissolve 120gm of Epsom salt in 1 liter of distilled water (this creates an electrolyte of 1 molar concentration). You can warm up the water to help dissolve the Epsom salt. Mix it well until there aren’t any solids left.
Fill each battery cell and close the battery caps. Shake to distribute the salt evenly.
6. Recharge The Battery
Set the battery in a safe and secure area.
Remove the battery caps again as an additional precaution — the electrolyte solution will heat up and may overflow during charging.
Connect the battery charger to the battery terminal — the red wire to the positive terminal and black wire to the negative terminal.
Keep the charger as far away from the battery as possible, then set it to charge a very low current of 12V / 2 Amps. Charging at a low current allows the Epsom salt to break down the lead sulfate crystals on the battery plates.
Let the battery charger run for 24-36 hours.
7. Test Battery Voltage And Loading
Disconnect the battery charger and check the battery voltage with the voltmeter. The readings should be around 12.42V. If lower, reconnect the battery charger and charge up for another 12 hours.
If all is well, perform a rudimentary load test:
- Reinstall the battery, turn the ignition key to “ON,” and switch on the high beams
- Check the battery voltage again
A voltmeter reading of 9.6V means the battery is good.
Alternatively, you could use a dedicated battery load tester for this if you have one on hand.
Now that you know what battery reconditioning is and how to do it, let’s go over some FAQs.
7 Battery Reconditioning FAQs
Here are the answers to some common questions on battery reconditioning:
1. What’s The Difference Between Reconditioning And Recharging?
Battery recharging is simply charging up the battery for a period of time.
Battery reconditioning, however, means restoring a battery to full functioning capacity. It’s not the same as battery conditioning when you charge a new device battery before using it.
While battery reconditioning can be done with materials found at home, there are also services that use a dedicated battery regenerator (or battery reconditioner). The battery regenerator uses high-powered pulses to break down sulfation on battery plates.
2. Why Would I Want To Recondition My Car Battery?
There are several advantages to reconditioning batteries.
Car battery reconditioning can:
- Extend your battery life: Lead acid batteries typically last 3-5 years. Reconditioning an old rechargeable battery can extend its life by a year or two.
- Save costs: You can save some money by not having to purchase a new battery.
- Help the environment: Fewer batteries will be disposed of, lessening the exposure of pollutants to the environment.
3. When Shouldn’t I Recondition A Battery?
There are a couple of situations where you shouldn’t recondition a battery.
These include:
- When the batteries have been reconditioned three times or more: Battery performance degrades with every reconditioning (and age), so it reaches a point when it can’t be refurbished anymore.
- When the battery is damaged: A physically damaged battery shouldn’t be reconditioned.
- When reconditioning materials aren’t available: If you don’t have the right materials, don’t attempt reconditioning.
4. How Long Do Reconditioned Batteries Last?
A reconditioned battery can typically last around one year, so you can theoretically extend its life by at least three years if you repeat the process a few times.
5. When Should I Recondition A Car Battery?
Battery reconditioning is typically performed when it has lost around 30-40% of its original capacity. However, if it’s lost part of its plates from sulfation or is severely corroded, it might not be recoverable.
Note that desulfation using a battery regenerator (battery reconditioner) can be done at any time. It can help improve batteries that are even as young as 1-2 years old.