Laser Build CNC Router Build
3d printer Build
Legal: Purchases made via links on this page may pay us a commission at no extra expense to yourself. Amazon affiliate program member.
Build Cost Calculator
Modify Convert 3D Printer
Spread Sheet
Optiamal 80 watt laser MKS board Modified Frame for 19" / 17.5 panels. Portable> lightburn software
Suggested Path... Ortur 20W> 80watt Laser> MkS upgrade>X upgrade
Linux Installation
- Open a terminal and run the following command:
sudo adduser $USER dialout && sudo adduser $USER tty- IMPORTANT! Log out and log back in (this refreshes the permissions we just added)
- Download the Linux 64-bit version, either the
.run file or the .7z file and follow the appropriate steps below:
.run installer
- Open your terminal and
cd to the directory you downloaded the file to. - Run
bash ./LightBurn-Linux64-v*.run - It will now automatically install and create a program listing in your desktop environment.
.7z installer
- Extract the folder wherever you want Lightburn to exist
- Right click
AppRun > Properties > Permissions > 'Allow executing file as program' - Double click
AppRun inside your Lightburn folder
Next: Running LightBurn for the first time
Activating LightBurn
If you've never used LightBurn before, you'll be shown the License
and Trial page first. Here you can either enter and activate a license
key if you have one, or you can activate a free 30 day trial by clicking
"Activate Trial". If you do have a license key, be sure to enter it exactly,
including the dashes, then click the 'Activate License' button. We
recommend just copying the key and pasting it into the License Key box.
You can get back to this screen in LightBurn at any time by going to the menu and clicking Help > License Management.
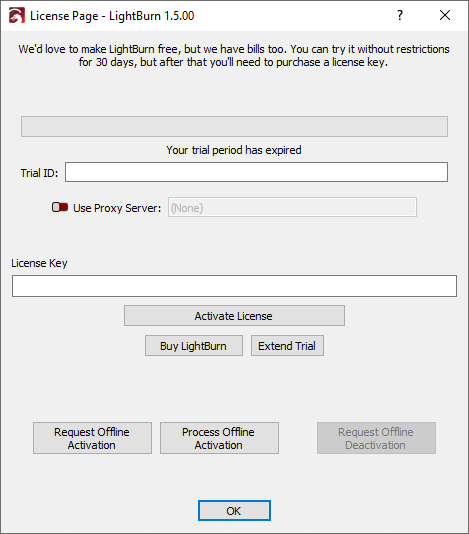
Once you have activated your license or the trial, click 'OK'
The next thing you'll see is the 'General Usage Notes' page - this is
a brief help page just to get you going. You can get back to it any
time in the Help menu, under Help > Quick Help and Notes. Click OK.
You're almost done!
Next Step: Adding your Laser to Lightburn
What if I don't have a laser yet?
We get asked this frequently - You don't ever need to connect a laser
to LightBurn to use it, but LightBurn will not run without a device
profile configured, because it needs a place to store some settings, and
wants to know what options to show you in the interface. If you use a
laser that accepts files on a USB drive, for example, LightBurn needs to
know which controller it uses so it can produce the correct output
files.
If you don't have a laser yet, or don't know what you're going to buy
and just want to try it out, you can just set up an arbitrary device
profile, because these options don't affect the design side of things,
just the machine output and laser settings.
In either case, use Create Manually
and configure the things you can, and guess at whatever you don't know -
it won't matter in the end. When you finally do get your laser, you
can come back to this screen, select the 'dummy' profile you set up, and
click 'Remove'. Close the window, restart LightBurn, and the software
will guide you through the setup again, pulling many of the settings
from the controller of your machine. If you get it mostly right, you
can double-click the existing profile, then go through the pages and
change anything you need to later. Either way works.
Turnkey Machines
Fox Alien Seems to be the most readily complete solution.
Ortur is safest.
Building your own has it's rewards but will generally take months.
Rotating Y LASER Etcher


